

We all have our own holiday traditions, don’t we? It’s those things that we look forward to doing and enjoying year in and year out. And, for some of us, many of those annual traditions happen to be of the edible variety. As a child, one of my favorite edible traditions were the marshmallows piled atop the yams. No marshmallows, no yams; they went hand in hand. Another childhood tradition of mine was the yearly “book” of Life Savers. One was always in my stocking; and, back in the day, the book featured Life Saver rolls in different flavors, not eight of the same flavor like it is these days.
Now that I’m a grown-up, my favorite holiday traditions center around Christmas morning breakfast. It’s something that my husband’s family has done for years and years, and I slobber just thinking about the overnight egg casserole, Stollen (my hubby’s family has German roots), and scrapple. Yummm. Bring. It. On.
One of the holiday traditions for those of French heritage is the Bûche de Noël, or Yule log cake. It appears that, back in the day, when celebrating the winter solstice, families would burn a log to commemorate the event. The transition from actual log to baked good that looks like a log came, according the history.com, when fireplaces became too small for big logs but just right for baking cakes that looked like them (makes complete sense to me).
I figured that, for our Saturday Snacks recipe right before Christmas, we needed to go big or go home. Thus, today, we’ll make our own Bûche de Noël. A cake of our own that gushes forth with chocolate? Yes, that’s just what we need.
My mom and I made a Bûche de Noël for my French club’s Christmas party my junior year of high school. And by my mom and I, I mean I volunteered my mom to make the cake. I remember scant details regarding said Yule log cake, but I can still sing the chorus of Jingle Bells in French, so the club party wasn’t a complete loss. Ahem.

If you were in Walt Disney World right now, you’d have three different opportunities to eat three different varieties of Bûche de Noël. The Yuletide Wishes (my favorite, above left) is found at Pinocchio Village Haus in Magic Kingdom. There’s also a caramel variety found in EPCOT at Marche de Noel (above right). The final one, a maple take on the treat, can be found at Yukon Holiday Kitchen in the Canada pavilion. Maple isn’t my thing, so that one holds no temptation for me.
Today’s Yule log cake comes to us from the chefs at Disney’s Yacht and Beach Club resorts. It was released in 2011, and as sometimes happens with recipes, some of the nitty gritty details were left out of the recipe. I’ve added some of those details in brackets in the recipe at the end of this article.

Our first step to creating a cake of our very own (as we should all should have at the end of 2020) is to create the chiffon cake portion of the dessert. A chiffon cake stands out from others due to the use of oil rather than butter. The chiffon cake for a Bûche de Noël is thin, and needs hardly any time in the oven. To begin, we’ll need to line a 9×13 cake pan with parchment paper. An easy way to ensure that the parchment paper is the correct size is to trace around the bottom of the pan onto the paper and then cut just inside the line.

Give your pan a good coating of spray oil, place the parchment paper into the pan, and then coat the surface of the paper with another round of spray oil.

The ingredients list for our French treat is fairly simple. We’re looking for a semi-sweet chocolate that’s on the darker side of things, and while I started out my hunt for just the right chocolate with baking chocolate bars in mind, once I surveyed what my store had on the shelves, I opted for chocolate chips. They would have to do. We do what we can, and chocolate’s not something we stress about ’round here. Especially just before Christmas. Grab those chips and run.

Into the bowl of a stand mixer (or a large bowl with a hand mixer), place 1/2 of a cup of all-purpose flour, 2 tablespoons of cocoa powder, 1/3 cup of sugar, 1 teaspoon of baking powder, and 1/4 teaspoon salt.

Mix everything until it’s completely combined and sifted through. Careful: that cocoa powder will have a tendency to take flight if you run the mixer too fast or too long.

The recipe calls for us to add the next ingredients one at a time while the mixer is running on low. I decided not to tempt fate and I instead opted to stop the mixer, add the ingredient, and then start it back up on low for each one. The ingredients added during this step are one egg, 2 teaspoons of vegetable oil (I used canola since that’s what I had in the pantry), 2 teaspoons of milk, and half a teaspoon of vanilla extract.

While mixing, be sure to scrape down the sides of the bowl to make sure everything’s getting incorporated. Keep combining until the mixture is nice and smooth.

Transfer the batter to a separate large bowl. You’ll need it in just a few minutes. After transferring the batter, wash the bowl and attachment of your stand mixer; you’ll need them nice and clean and dry for the next step.

Into the clean stand mixer bowl, toss 2 egg whites, 3 teaspoons of sugar, and a pinch of cream of tartar. Side note: it drives me a little nuts when recipes call for a pinch of anything. Just tell me how much to use, please. My pinch could be bigger than the next person’s and we all just want things to turn out right, so please just tell us, mmmkay? I digress. Rant over.

It’s time for us to step on the gas. Go ahead on turn your mixer on high and combine the ingredients until you see soft peaks form. Soft peaks are where, when you lift the beater, the mixture comes to a peak just slightly. The peaks will fall over, and that’s just what you want in this case.

The recipe now asks that we fold one-third of the egg white mixture into the bowl that contains the cake batter (anyone having visions of Moira and David right about now?). Folding an ingredient in simply means that we mix the ingredient in with a gentle turn of the spoon. You don’t want to mix vigorously or those soft peaking egg whites will go kaflooey.

Once the first third of the egg whites are worked into the batter, you can fold in the remaining egg white mixture.

Pour the batter into your prepared cake pan, pop it in a 350 degree oven, and set the timer for 6 minutes.

Again, this cake is thin, and even though the recipes calls for us to leave it in the oven for 6 to 10 minutes, I pulled mine out after 6. A cake this thin could crack if it’s too dry, so let’s not mess around.

Thankfully, my cake looked a-okay when it came out of the oven, and I let cool for 10 minutes and then, very gently, pulled it out of the pan (while still attached to the parchment paper) and onto a kitchen towel. The recipe says that we can trim any hard edges off of our cake at this point, but I didn’t have edges that I thought were necessarily crispy, so I skipped that step.

Next, while holding your breath (okay, that part isn’t in the recipe, but…) and using the kitchen towel, roll the cake from one of the short ends. Yes, you can do it. It feels weird to be rolling a cake, but it’s part of the plan, and, with a cake this thin, it can be done. Roll that cake (still attached to the parchment paper) into a cylinder. You can do it.
While your rolled cake waits, it’s time to throw together the creamy mousse filling. You’ll want to separate the yolks from the whites of two eggs. In a large bowl, whisk together the two egg yolks and 2 tablespoons of sugar for about three minutes. They should turn a lighter color and form soft peaks.
We’ll now turn our attention to melting some chocolate using a double boiler, or, as in my case, a double boiler techinuqe using a saucepan filled halfway with water with a glass bowl on top.
Let the water in the saucepan come to a simmer, and toss 6 ounces of darker semi-sweet chocolate (finely chopped or chips) and 3 tablespoons of butter into the glass bowl to melt. Stir that butter and chocolate (and shove a few chips into your mouth as payment for your efforts), and, once everything’s combined and smooth, take it off of the heat and set it aside to cool.

Once the chocolate mixture is cool, combine it with the egg yolk mixture.
Into the bowl of your stand mixture (yes, you’ve washed it again…augh…) or a separate bowl, place the whites from the two eggs that you separated earlier. Beat the whites until they’re frothy, and then add in 2 teaspoons of sugar. Beat the sugar and whites until medium peaks form.

In a separate bowl, whip 2 cups of heavy cream using a hand mixer (’cause I’m not washing that stand mixer bowl for a fourth time, thankyouverymuch) on high speed until soft peaks form.

We can gently fold the egg white mixture into chocolate mixture, then gently fold in whipped cream (lots of folding happening here). The recipe tells us that it’s okay if some streaks of cream remain in the mousse and asks us not to overmix the mousse. We’re then to refrigerate the mousse until it’s cold. And, in my experience, I would suggest that you keep that mousse in the fridge for longer than you think it needs. When I moved to the next step, even though I had let the mousse hang out in the fridge for quite a while, it needed more time. And leave the mousse in the fridge until you’re ready to use it. Don’t let it sit out on your counter, or it won’t hold its mousse-like texture and form. I’ve come to learn that mousse is a fickle thing.

Once the mousse filling is very cold, gently unroll your cake, remove the kitchen towel, and slather that mousse all over your cake. Spread it out evenly.

Then, using the help of the parchment paper, but pulling it off of the cake as you go, roll the cake slathered in mousse back into a cylinder. You can do it. It’s okay if the cake cracks slightly as mine did in a spot or two, because we’re going to cover it in a glorious chocolate ganache. Ganache makes everything better.
Once your cake is rolled, use the parchment paper to keep it rolled and place it seam side down in your fridge. While the recipe tells us to let it stay in the fridge for an hour, I suggest overnight. My mousse started to squish out of the cake (again, it needed more time than I thought it did), and extra time in the fridge was the cure.

When your cake is ready, leave it in the fridge and whip up an easy ganache. Heat 3/4 of a cup of heavy cream in a small saucepan, but make sure it doesn’t boil. Place 8 ounces of dark chocolate (chips or otherwise) into a separate bowl and pour the hot heavy cream over top.

Whisk the cream into the bowl with the chocolate and keep whisking until the two are combined. Set aside the ganache until it’s slightly cool but still spreadable.

When your ganache has cooled, pull your cake out of the fridge and gently pull the parchment paper off of it. I cut off the ends of my cake so that it would have a completely filled piece on both ends.

Place it on a platter and smooth that divine ganache over the entire thing.

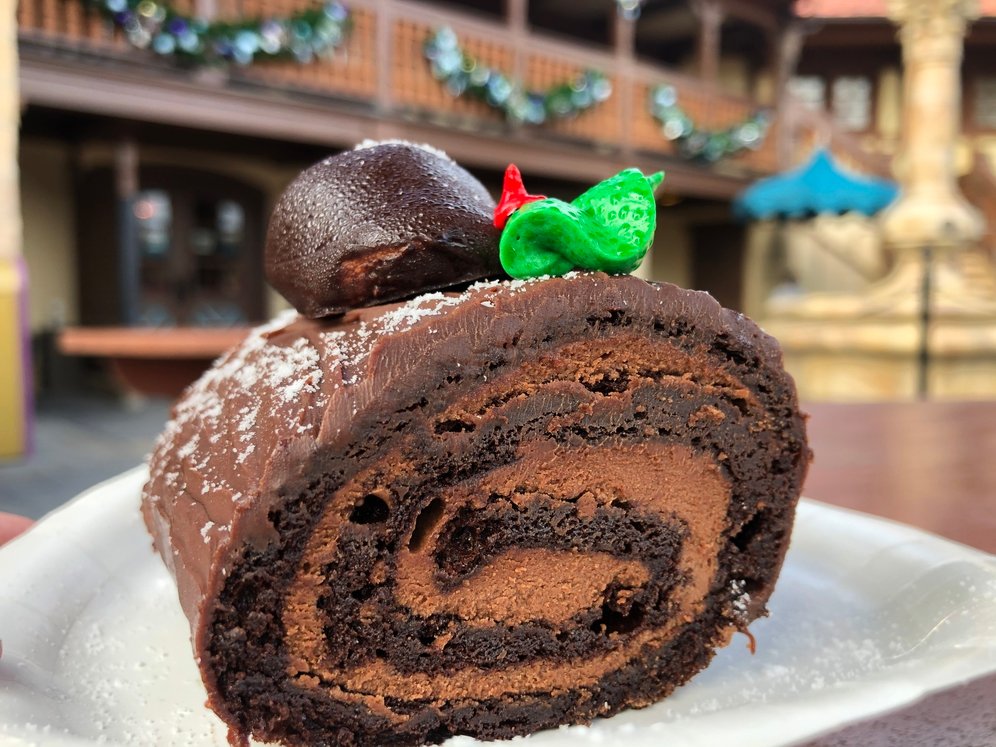
Lightly drag a fork through the chocolate ganache to create a faux bois (fake wood) effect, et voilà! You have a Bûche de Noël!

Sprinkle the whole enchilada with crush peppermint candy, and dig in. If you have vanilla ice cream on hand, even better.

Friends, this make take a little time to make, but it’s worth every decadent, chocolatey bite.

The richness of the ganache combines beautifully with the light chiffon cake and creamy mousse to create a holiday dessert you won’t soon forget.

It’ll be one that I make again. I’ll roll it a bit more tightly next time, and keep that fickle mousse in the fridge as long as possible, but I’m pretty proud of the results. In fact, maybe I’ll make one for my mom one day to make up for the one that I roped her into making in high school. She’d love it.
What holiday treats are you whipping up this weekend? Please let me know below.
May your Christmas be filled with joy. This year is hard, things are different (I would normally be in Maryland celebrating an early Christmas with my side of the family today), but, despite it all, there is joy to be found. Let’s find it this weekend, and throughout the week to come, and let’s savor it when we do.
And let’s definitely eat something yummy. Merry Christmas, friends.
Ready to give the Bûche de Noël a try? You’ve got this. The recipe is below:
Yule Log
Serves 6 to 8
Chocolate chiffon cake
1/2 cup all-purpose flour
2 tablespoons cocoa powder
1/3 cup plus 3 teaspoons sugar, divided
1 teaspoon baking powder
1/4 teaspoon salt
1 egg
2 teaspoons vegetable oil
2 teaspoons milk
1/2 teaspoon vanilla extract
2 egg whites
Pinch cream of tartar
Chocolate Mousse Cremeux
2 eggs, separated
2 tablespoons plus 2 teaspoons sugar, divided
6 ounces dark semi-sweet chocolate, finely chopped
3 tablespoons butter
1/2 cup extra heavy cream
Chocolate Ganache
8 ounces dark chocolate
3/4 cup heavy cream
Crushed peppermint candy, for garnish
For chiffon cake:
- Preheat oven to 350°F. Coat a 13x9x2-inch baking pan with nonstick spray. Measure and cut a piece of parchment paper to line bottom of pan and spray with nonstick spray.
- Sift together flour, cocoa powder, 1/3 cup sugar, baking powder, and salt and place in bowl of an electric mixer fitted with paddle attachment. With mixer running at slow speed, add egg, oil, milk, and vanilla extract one at a time, scraping bowl after each addition until mixture is smooth. Transfer batter to a large bowl.
- After thoroughly cleaning mixer bowl, combine egg whites, remaining 3 teaspoons sugar, and cream of tartar. Whip on high speed until soft peaks form. Fold one-third of egg white mixture into cake batter, then fold remaining egg white mixture into batter.
- Spread batter evenly into prepared pan. Batter will be only 1/4-inch deep. Bake 6 to 10 minutes, just until set. Do not overbake.
- Remove cake from oven, let cool for 10 minutes. While cake is still warm, slide it out of pan, with parchment still attached, onto a clean kitchen towel. Trim crispy edges off the long sides of the cake. Beginning at one narrow end, use the towel to roll cake—along with parchment paper—into a cylinder.
For mousse cremeux:
Combine egg yolks and 2 tablespoons sugar in a large bowl; whisk until light in color and thickened to a soft peak, about 3 minutes.
Fill a medium saucepan about halfway with water. Bring water to a simmer. Combine chocolate and butter in a heatproof bowl and place bowl over simmering water, making sure bowl does not touch water. Stir chocolate mixture constantly until completely melted. Remove from heat and set aside to cool slightly.
When chocolate mixture is room temperature, stir into egg yolk mixture.
Place egg whites in the bowl of an electric mixer fitted with whisk attachment. Beat until frothy, then add remaining 2 teaspoons sugar, beating until medium peaks form.
[In a separate bowl,] whip heavy cream on high speed until soft peaks form.
Gently fold egg white mixture into chocolate mixture, then gently fold in whipped cream. (Some streaks of cream may remain, do not overmix.) Refrigerate until cold.
For ganache:
- Place chocolate in a large heatproof bowl.
- Heat heavy cream in a medium saucepan over medium heat until hot but not boiling.
- Whisk cream [into bowl with chocolate and whisk] until combined. Set aside until slightly cool but still spreadable.
To assemble:
- Carefully unroll cake from towel; remove towel. Spread mousse over cake surface. Using parchment paper to lift up a narrow edge of the cake, roll it back up, over the mousse, peeling off parchment paper as you go.
- Once cake is rolled, wrap parchment paper around it to keep it round and place cake seam side down on a platter. Refrigerate about 1 hour, until firm.
- Remove parchment paper from cake and ice with ganache. Sprinkle with crushed peppermint candy. Refrigerate until ganache is set, about 30 minutes, before serving.
Source: Disney Parks Blog